Sunday, December 15, 2013

Christmas Party Time with SU Tags


These girls know how to party!!!  We  had a blast being silly, exchanging ornaments, EATING, and making Christmas tags at the Scrap Club party Friday night.  I will have to get Suzie's recipe for Cranberry/Pecan/White Chocolate Clusters - a big hit!  We feasted on fruit salad, chocolate covered strawberries, pork loin, sausages, brownies, onion dip, and so many more treats!  We shared stories of our adventures and worked together - ahem! to create four gift tags for those special people that appreciate a handmade tag!
The first tag came from Becky Roberts at Inking Idaho.  She actually sells tutorials for 12 Designs for the Twelve Days of Christmas so I splurged on a little extra holiday inspiration!  Check out her her website at www.inkingidaho.comI used some retired tinsel trim to tie the chevron ribbon instead of baker's twine.  I especially like the way she used two circle punches to cut a ring for the ribbon to tie on to.  It uses the Festive Flurry stamp and punch.


The red "Oh What Fun" tag is actually a gift card holder.  The template also came from Becky Roberts at Inking Idaho.    I used the embossing folder to create an oval frame that perfectly fits the large oval punch for the sentiment. 
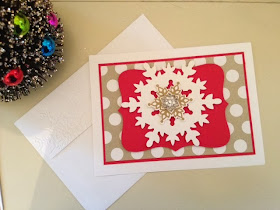
    I just had to have a Santa Claus in the mix so he peeks out from the top of a snowflake on a very quick and simple tag.  Oh what fun!                         Supplies are available at www.lyndafalconer.stampinup.net 
or email me at lyndafalconer57@gmail.com for more information.


Snow Flake Tag:  Festive Flurry Framelits Dies Item #132193, Festive Flurry Stamp Set Item #131781, Frosted Finishes Embellishment Item #132150, Sentiment from Embellished Events Item #126497
Oh What Fun Gift Card Holder:  Christmas Messages stamp Item #131790, Textured Impressions Designer Frames Item #123130
Santa Claus:  Santa's List stamp set Item #131811, Festive Flurry Framelits Dies Item #132193, 1.5 and 1.25 inch circle punches


Monday, December 9, 2013

Let It Snow!!!

Just had to share two pics from our hotel window in St. Louis last week during the snow.  Most snow was south of the city as we found out on our trip home!!  The city was beautiful with the perfect dusting! We had time to tour the Westward Expansion Museum in the court house and saw the courtroom where the Dred Scott case was tried.  Beautiful architecture and woodwork.  They were going to have a period Christmas dance with people in costume the day after we left.  That would have been fun to learn to dance the minuet or whatever they did in those days!

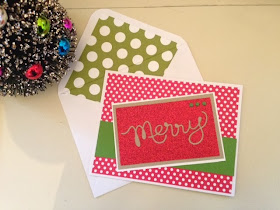
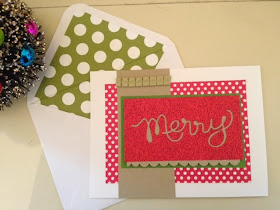
Today's post gives 2 ideas for what to do with those reverse images left when you cut out the Expressions Framelit
die.  I just couldn't throw away what was left from the Merry so made some quick and oh so fun cards from them.  Would love to know what you've done!

Sunday, December 8, 2013

Quick Christmas Cards and Tags with SU

It's soooooo good to be home in my warm and cozy scrap room!  I spent a harrowing 13 hours yesterday trying to get home from St. Louis with my hubby!  Five hours were spent trapped in a traffic jam (mostly trucks) on I-55 in Southern Missouri then later in Arkansas because of truck accidents!  Those boys just won't slow down!!!  5 hours!!!! just sitting on the road!  Got to be a little scary once it started getting dark but the 2nd wreck was finally cleared and we made it home safe about 10:00 PM.  Don't care to do that again!  So grateful it was just us in the car - not kids or grandkids!  Also grateful we were not involved in the accidents! 

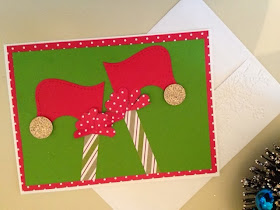
On a lighter note - it's almost Christmas!!!  Can't wait to finish decorating and get treats made for our scrap group - they'll be here Friday for our Christmas party.  I'll share pics here as soon as I get everything ready.  For now - here are some quick cards I made with leftovers.  I'm sure you'll recognize the pieces.  The elf legs  idea is  from a You Tube video and made from the Top Note Die Cut - (Stampin' Up). That mischievous elf keeps turning upside down! Enjoy!  

Tuesday, November 19, 2013

Prize for Sharing!

Giant presents at Fashion Mall in Las Vegas Circa 2007
Crafter Inspired Blog is almost to 1,000 views!  I know that seems small to some of you, but I just have to celebrate this milestone!  Starting a blog isn't easy and I am so grateful to all of you who have taken this journey with me!  Soooooo.... I'm offering a great prize to a random follower when I get the 1,000th view.  How do you enter?  Sign up to follow my blog, share my link with your friends on facebook or twitter (www.crafterinspired.blogspot.com), then leave a comment on my blog between now and view #1,000!  I'll randomly draw a comment and post the winner.  Be watching to see if you're getting an early Christmas present!  Ho, ho, ho!!!!  Don't you just love presents????

Had 10 lovely ladies over for chili and Christmas card making last Friday.  We had a blast and as usual, I overplanned so we worked until almost 10 pm!  We made 2 cards and a tag, all inspired by my pinterest searches.  Not sure what the protocol is for borrowing inspiration so let me know if I step on any toes!  The Santa tag was adapted from one by Jenn Tinline at www.stampwithjenn.com.  I love the way she used half the apothecary punch (Stampin' Up) for Santa's beard.  Materials used and how to get them are posted below. 

 The second card looked soooo "Delta" - must be the burlap - quite the rage in Mississippi!  It was designed by Canadian Maggie Patterson at www.ilovepapercrafts.com and I didn't change a thing. This was quick and easy so could be reproduced in mass for your family card.  Maggie does simple, beautiful cards that would be great for a beginning card maker.  She even has her own cardmaking book!  Check out her website if you get a chance.

So who's going to win???  I promise the prize will be worth your while!!!  I'd love to hear suggestions for my blog - also need to know what camera to get - still taking pictures from my iphone and I'm not happy with the clarity online.  Look forward to hearing from you!

Lynda aka Lynderclause

Order supplies at www.lyndafalconer.stampinup.net

Santa Tag supplies:
Apothecary Accents Framelit  Item #127003 
Real Red Cardstock Item #102482 
Black Cardstock  Item #121045 
Glimmer Paper - Champagne  Item #127885
Christmas Tagables Photopolymer Stamp Set  Item # 134623 
Classic Stampin Pad - Real Red  Item #126949
1/8 " Taffeta Ribbon - Black Item #119261
Red striped ribbon is retired. 

Burlap Ribbon Card supplies:
Beautifully Baroque Embossing Folder  Item #130917
Christmas Collectibles Ornament Punch and Stamp Bundle  Item #133283
1 3/4" Burlap Ribbon  Item #132140
Linen Thread Item #104199
Large Pearl Basic Jewels Item #125577
Christmas Tagables Photopolymer Stamp Set Item # 134623 
Medium Envelopes  - Crumb Cake  Item  #107297
Cardstock - Crumb Cake  Item #120953
Cardstock - Cherry Cobbler  Item #119685


Wednesday, November 13, 2013

Christmas Card Jingle

James Taylor is serenading me with "Baby It's Cold Outside" while I finish designs for Friday's Christmas workshop.  I love cool, crisp, days with the sun shining and my craft room calling!  Went to Mistletoe Market in Jackson, MS last week for a little holiday inspiration and boy did I find it! Just finished this cardinal card tweaked from a card on Pinterest by Elizabeth P at  Seeing Ink Spots.  I didn't have all the supplies for her card so used what I had.  You may not recognize it!I'll put a supply list and design hints at the bottom of this post.

Spent the weekend pinning Christmas ideas from Pinterest and checking out my latest splurge!  I bought 2 video tutorials for Christmas card, tag, and favor ideas so I'm anxious to tweak these ladies' fabulous designs and learn new skills.  A girl's got to have skills, you know!!!  The first was from Becky Roberts at www.inkingidaho.blogspot.com , a fabulous Stampin' Up Demonstrator whose style I LOVE!  You can check out her blog and video tutorials by clicking her name above.  I made the Dixie Cup favors and Snowflake Tag box so far.  Need more time!!!

Will save the other tutorial for later after I've made something from in.  Please check out my Pinterest Board called Christmas (Lynda Falconer) for lots of card ideas.  Might save you some time if your taste is similar to mine. 


Better get back to work.  2 more projects to go for Friday's workshop and can't decide what to do first!!  I'm so grateful for all of you and this crafty life I live!  Here's a card we made at a women's fellowship group with about 12 women ages 40-90ish.  Many had never scrapped before and all their cards turned out beautifully!  It was so exciting to see how proud the ladies were of what they made!  Doesn't get much better than that!  Have a blessed Thanksgiving!
Lynda

Red Bird Christmas Card:  Order Supplies Here

Bird Builder Punch                                        Item #117191
Northern Flurry Embossing Folder               Item #120902
Woodgrain Embossing Folder                       Item #127821
Apothecary Accents Framelits                      Item #127003
Whisper White Craft Ink                               Item #101731
Gold Metallic Encore Ink                              Item #132141
Christmas Messages Stamp                           Item # 131790
Whisper White Card Stock                            Item #100730
Real Red Cardstock                                       Item #102482

Monday, October 21, 2013

Celebrate Fall with Stampin' Up Harvest of Thanks Candle

There's something about the changing seasons that lift and refresh my spirit!  We had our first really crisp, cool, fall day this weekend!  It was the perfect follow up to our Fall Scrap Night.  We had a great time making Thanksgiving candles and Halloween Treat Boxes after indulging in a pot of beef stew and cornbread.  Just had to try some of those cute Halloween treats from Facebook and Pinterest but the brownies with caramel icing (a mix!) were the big hit!
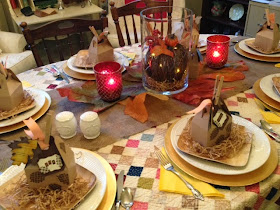
I kept the antique (grandma's) quilt on the table and added a pumpkin, fall leaves, and burlap placemats.  Had to show off my bargain fall cloth napkins from Home Goods in Madison, MS!  Always find goodies there!  Cupcake holders were filled with candy and a cupcake topper.  I used Martha Stewart's masks (on sale at Michael's) for place cards and wrote guests names in the corner.  They were perfect for photo ops too but we always forget once we start eating!  Go figure!  The masks really stood out on the porch pumpkins and a covered cake plate I used for more decorations. 


The party favors were made from Stampin' Up's Witches Brew Designer Series paper.  I cut out a library card shape from my Silhouette, then decorated it with the Owl Builder (Item # 118074) and Bitty Banners Framelits (Item #129267).  So simple!


The real fun begins at craft time!  We made Thanksgiving candles from $3.50 Wal-Mart candles and some scrapbook supplies.  We wrapped the candle with two layers of Sweater Weather Designer Series Paper (Item # 132184 Stampin' Up).  You need to use a heavy adhesive such as two sided tape to get them to stick.  Simple rectangles were used for the labels with the sentiment stamped from "Harvest of Thanks" stamp set (Item # 131736) and Apothecary Accents Framelit die cut (Item #127003) - my new favorite!  If you need to know how to do the 2 color stamp just leave a comment and I'll give directions.  We punched both sides of the sentiment and ran a ribbon from one side, under the sentiment, and around the candle.  Then we tied it in a bow on one side.  It makes a beautiful fall decoration for your home or the perfect hostess gift for Thanksgiving dinner!
 

Finally, we finished off our "Ghouls Night Out" with a Halloween treat box, perfect for candy, cookies, muffin, cupcake - or any treat for someone very special.  Again we used the Witches Brew Designer Series Paper (Item # 132185) and made a banner.  Double stick tape was placed down the center and glitter applied on top to get the glittered stripe.  Only attach it to the top so you can get the box open.  A small glue dot near the bottom will hold the bottom of the banner piece down when the box is closed, but allow easy access when you want to open it.  We topped the banner with a 2 1/2 inch circle edged with green tulle ribbon (Maya Road I think).  The rosette was punched from a Tim Holtz die cut and topped with a decorative label punch (Item # 120907) and scallopped oval (Item # 119856) stamped with Beware Bat from "Halloween Bash" stamp set (Item #130580). 
 
Hope you have a chance for a "Ghouls Night Out" with friends this season!  If you don't have a Stampin' Up Demonstrator, materials can be purchased at my website at www.lyndafalconer.stampinup.net
 
I'd love to hear from you!


Sunday, October 13, 2013

It's the Most "Wonderfall" Time of the Year!!!

Just got back from Maine and I am so inspired!  The leaves were beginning to turn the most vibrant red, yellow, and orange I've ever seen!  We took a train ride out of Belfast through the woods where I snapped this pic - just beautiful!  There were pumpkins in every doorway, fall wreaths on the doors, and the air was cool and crisp!  I just had to decorate my own porch when we got home although it wasn't the same at 90 degrees!  I KNOW a cool front is just around the corner!

The Fall Frenzy continues with these "Happies" for our last Scrap Club dinner.  I enjoy being around such a creative and fun group of Delta Scrappers!  We always have dinner - usually I try a recipe from Facebook.  I made Crescent Roll Chicken Casserole and set the table with an antique quilt and burlap runner.  The party favors were decorated boxes filled with pistachios.  Love that Washi Tape for sealing bags and attaching things in a decorative way!  The tags were made from Stampin' Up's Chalk Talk Framelit Die and run through the Woodgrain Embossing Folder with the Big Shot.  The leaves were cut from Fall Accents Die Cut using Sweater Weather Designer Series Paper.  Wonderfall Stamp Set with Chocolate Chip Ink made the leaves stamped on the box then I used chevron ribbon and a clothespin to embellish. The tag was punched from SU's Decorative Label Punch.   So much fun!!!  If you can't resist, materials can be purchased at my website www.lyndafalconer.stampinup.net


Thanks for stopping by!  Love hearing from you and always appreciate your feedback - especially since I'm fairly new at blogging!  Please feel free to share this blog  :)

www.crafterinspired.blogspot.com


Monday, September 23, 2013

Fall Tag with SU's Autumn Accents, and Chalk Talk Die Cuts

I've been looking for an excuse to bake Caramel Banana Nut Muffins ever since I picked up a mix at Williams and Sonoma.  It's one of my favorite stores but I live in The Delta near the Mississippi River so I drive over 2 hours to a well stocked shopping mall.  It is a real event when I go to "the city" to get my shopping fix!  When I found out my friend had to get a cortizone shot in her foot and was to stay off of them, I had my excuse!  The muffins were soooo yummy but you know how the story goes - If you give a scrapbooker a muffin, she's going to ask for a basket to put it in.  If you give her a basket, she's going to ask for a pretty towel to keep the muffins in the basket warm.  If you give her a towel, she's going to need a coordinating, to-die-for label with appropriate sentiment to decorate the towel.  Can you tell I used to be an elementary teacher?  Love that book (If You Give a Mouse a Cookie by Felicia Bond).


Anyway ....  here's what I came up with from my stash.  I'll list the supplies used below - all are from Stampin' Up and can be purchased on my website using the link in the margin OR substitute similar supplies you have on hand.

Directions:  Cut a tag from Brown Sugar Cardstock with Chalk Talk Framelit Die and emboss it with the Woodgrain embossing folder.   Type the sentiment on your computer and print it on Very Vanilla cardstock.  Use the medium Chalk Talk Framelit Die to cut out the sentiment.  Embellish the sentiment by stamping the edges with part of the leaf from Wonderfall Stamp Set using chocolate chip ink.  Cut the  acorn and leaves from the Autumn Accents Bigz Die Cut using paper from Sweater Weather Designer Series Paper.  Ink all edges of all pieces with Chocolate Chip ink and use dimensional dots to adhere and raise the acorn, sentiment, and top leaf.  Insert Chevron Ribbon into tag opening and tie with baker's twine.   Add a basket of muffins or a good book and go make someone's day!!!  Happy Fall!

Saturday, September 21, 2013

Memory Tray Ready for Gifting

Do you have memory trays in your closet just waiting to be loved?  After 3 years I finally got out my memory tray to make that special Christmas present for my sister-in-law!  Ashley, if you see this, hit ESCAPE now!!!  Don't want to spoil the surprise!

It all started when my friend Sue came over to scrap and brought a darling Peace Sign shaped memory tray to make a gift for her grandaughter.  I remembered I had about 5 trays in my closet just waiting for inspiration, so this was the perfect opportunity!  I pulled an old October Afternoon Farmhouse kit and shuffled through my stash for embellishments.  This is what I came up with.  I found that tape runner is not strong enough to hold the background paper on.  I had to lift it back up and add double sided tape (the orange roll) to get it to hold all the embellishments.  I am happy with the results and hope she will be too.  It's hard to mess up with my precious nieces as subjects!!!
 Now on to the other 5 trays!  Looks like I've got Christmas in the "tray" this year!  Oh come on, at least give me a grin for trying!!!  LOL!  Would love to see what you've done with Memory Trays!  Feel free to share!


Saturday, September 14, 2013

Christmas Card Makes Merry!

Here's my second Christmas card this season, thanks to Mary Fish at www.stampinpretty.com.  I used her idea and added the polka dot background paper.  I love red and white together and this card just makes me smile!  I especially like the fact that it is so easy with the Expressions Thinlit Die.  The materials used are listed below and can be purchased at my Stampin' Up Website link in the right column.  Stay tuned for more Christmas!! 
 
Stampin' Up Materials Used:
Red Glimmer Paper (121790)
Whisper White Cardstock (Item #100730)
Expressions Thinlits Dies (132171)
Bird Builder Punch for leaves (117191)
Polka Dot Parade paper (126902)
Large Pearls (125577)
Red buttons (my own)


Wednesday, September 11, 2013

MOJO310 - Christmas Card with SU Products


Pr
 
I've decided to kill 2 birds with one stone and enter my second MOJO Monday Card Challenge with a Christmas Card.  Julee Tilman designed a beautiful template!  I started with a Cherry Cobbler red cardstock and Crumb Cake polka dot  paper.  The white lines are drawn on with a straight edge and white gel pen. The green polka dot banner and the sentiment are raised with dimension dots. I used Versa Mark ink to emboss the lettering and it's border with Cherry Cobbler embossiing powder.  This was my first time to use the candy dots on their brad base and paper clip ribbon and I really like the effect.   Here's a list of materials I used.  All are available on my Stampin' Up Website except the tulle ribbon.  It is from Maya Road.  Please stop back by for my Christmas card ideas!  Enjoy!


Products for Card:  from Stampin'Up (see link)
Season of Style Designer Paper ( Item 132340)
Color Collection Brights Designer Paper (130134)
Old Olive Simply Styled Embellishments (132148)
Whisper White Card Stock (100730)
Crumb Cake Card Stock (120953)
Cherry Cobbler 1" Ribbon (132135
Cherry Cobbler Cardstock (132129)
Merry Little Christmas Stamp Set (131829)
Candy dot brad base (132293)
Candy dots Regal (130932
Tulle gathered ribbon from Maya Road
Cherry Cobbler Embossing Powder  (122949)  
Heat Tool (129053)
Uni-Ball Signo Gel Pen (105021)                                     
 

Monday, September 9, 2013

Hexagon Punch to the Rescue!

Here's a quick little thank you card using polka dots and a tiny envelope made from the hexagon punch.  All products are from Stampin' Up.  Use a pop dot under the scallop to make it stand up and a candy dot to embellish the mini envelope.  You'll need a glue dot under the envelope flap to hold it down.
 
As you can see on the right, the secret to making the envelope is in how you punch it out.  The picture shows you how.  Then you simply fold down the flap.  I usually score it across the fold line to make it easier - it's very small!  Please take a minute to subscribe to my blog for more ideas.  I'm working on Christmas cards now so I hope to share what I come up with very soon!  (I know - worse than Wal-Mart!  It's barely September!)


Saturday, September 7, 2013

Easy Gifts with Post It Note Holders


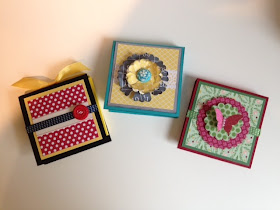
I made these Post-It Note holders at a craft workshop at the Leland Coffee Shop brunch.  Betsy made a fabulous brunch spread and we enjoyed the food and crafts on a Saturday morning.  These Post-It Note holders were so easy and we were happy with the results.  The base is a rectangle cut 3 1/2 " x 7 1/2 " with score marks at 3 1/2"  and 4" to allow for the width of a post it pad.  I used Stampin' Up papers and embellishments.  These would make the perfect gift - tuck one inside a cellophane bag with some colored grass and extra Post -It pads!

The Itty Bitty Butterfly punch and scalloped circles made an elegant cover using Birthday Bash Designer Series Paper and Gumball Green Stitched Ribbon.

I love to use a scallop punch to make flowers.  Just clip the petals toward the center about every 2 scallops.  I crumbled up the 3 scalloped circles and unwrapped them to give the flower a shabby chic look.  Don't forget to ink the edges - here in Stampin' Up's Basic Gray.  The SU lace trim is one of my favorite products - just peel and stick.  The button is from K & Company.

Monday, August 26, 2013

Love That Washi Tape!!!

I am loving that Washi Tape!  It makes cards a snap!  Here's a quick thank you card with Stampin' Up's Gingham Garden tape.  So simple and sweet!  This design would also make a cute birthday cake or Christmas tree with different sizes of tape in a stack.  I'll have to try that!

Found this idea at The Paper Crown - my favorite scrapbook store in Oklahoma City.  I visit their beautiful shop anytime I go to see my mom in OKC.  They have great classes and events so check them out by Googling "Paper Crown Blog".  I can't get the link to work here???
These frames were made by wrapping washi tape around a cardboard frame cut from the backing page in the Stampin' Up Designer Paper packs.  Of course the subject matter is my favorite part with grandson and niece adding their own cuteness to the project!

Items Used in Projects Shown:  All by Stampin' Up     Shop Here
Halloween Frame:
    Item #132156 Witches Brew Designer Tape $4.95 for 3 colors
    Item # 131269 Epic Day This and That Designer Washi Tape (orange) $4.95 for 3 colors
    Item # 119261 (black ribbon) and 119253 (orange ribbon)  1/8" Taffeta Ribbon  $5.95/10 yds

Christmas Frame:
    Item #132155 Season of Style Designer Washi Tape (Christmas) $4.95 for 3 colors
    Item # 126848 (Gumball Green ) 3/8 " Stitched Satin Ribbon $8.95 for 10 yds

Flowered Frame:
    Item #129314 Gingham Garden Designer Washi Tape $4.95 for 3 colors
    Item #126847 (Midnight Muse ) 3/8" Stitched Satin Ribbon $8.95 for 10 yds

Thank You Card
    Item #129314 Gingham Garden Designer Washi Tape $4.95 for 3 colors
    Item # 117193 Small Heart Punch
    Item # 131294 Pistachio Pudding Cardstock 8-1/2" x 11" $6.95 for 24 sheets
    Item # 100730 Whisper White Cardstock - 8-1/2" x 11"  $6.95 for 40 sheets
    Item # 126948 Melon Mambo Ink Pad $5.95
    Stamp sentiment retired but similar to Item #129690 Lots of Thanks Stamp Set $16.95

Had a great evening with 7 sweet ladies last Friday for a card/craft workshop.  We made the Washi (do you capitalize it?) tape frames, some Post-It Note holders, and a birthday card.  The Post-It holders are my favorite so I'll get info on those to you next. 


On a personal level, my husband and I took a drive to discover more of The Delta last Saturday.  They have begun harvesting corn in Mississippi - the farmland is beautiful even when the crops are brown! 


Please take a second to "Follow Me" or subscribe by email so you can stay up with the latest posts.  Feel free to share with your friends or on Facebook if you like what you see.  I am new at this so don't know if anyone see's it!  Would love your feedback!

Christmas is coming and I can't wait to get started designing cards!!!  Stay cool!